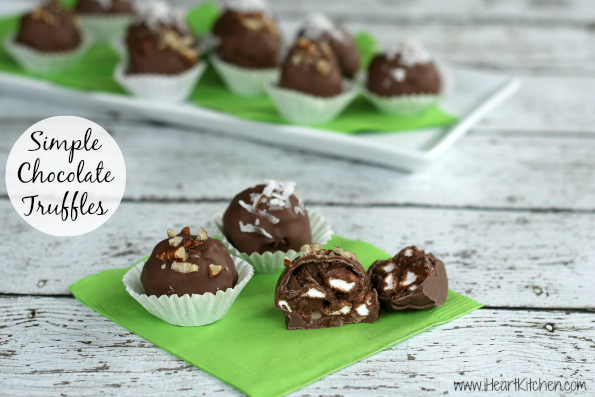
I Heart Kitchen

Recipes To Help You Love Your Kitchen

Image Map
  • Home
  • Recipes

Banana Peanut Butter Chocolate Chip Muffins

September 22, 2015 By Michelle Leave a Comment

Banana Peanut Butter Chocolate Chip Muffin

My boys get on kicks where they love bananas and eat two a day then will go three or four days before they eat another one. This week was one of those weeks where they weren’t wanting a banana apparently! I ended up with 5 neglected bananas that were looking a bit lonely and over-ripe.

It doesn’t really bother me too much because I know I can always use those bananas and turn them in to a tasty treat that I know they will happily gobble up! I often whip up a Chocolate Banana Bread With Walnuts or even…my favorite – a Blueberry Banana Coffee Cake. This week I opted to do a batch of Banana Peanut Butter Chocolate Chip Muffins.

Muffins are one of the easiest things to make. I have never understood why people buy the boxed mixes. It really doesn’t take much more time to measure up your ingredients and bake up a batch of homemade muffins. They are super simple and the taste is fantastic. I timed these so that they’d be ready when the boys were coming home from school and they quickly polished off two within minutes of walking in the door. They were begging for more but I had already planned that these would be part of breakfast the next day…so those boys were out of luck!

The next time you see a couple of over-ripe bananas, try this recipe and see how long the muffins last at your house!

Banana Peanut Butter Chocolate Chip Muffins
 
Print
Prep time
10 mins
Cook time
25 mins
Total time
35 mins
 
Author: Michelle
Serves: 12
Ingredients
  • 1 cup mashed bananas (about 3 bananas)
  • ⅔ cup sugar
  • 1 egg
  • ¼ cup peanut butter
  • 5 tablespoons butter, melted
  • 1½ cups flour
  • 1 teaspoon baking powder
  • 1 teaspoon baking soda
  • ¼ teaspoon salt
  • 2 tablespoons mini chocolate chips
Instructions
  1. Preheat oven to 350º F.
  2. In a medium bowl, mix the mashed bananas, sugar, egg and butter and peanut butter until combined.
  3. Sift in the flour, baking powder, baking soda and salt.
  4. Add the chocolate chips.
  5. Stir until moistened - do not over mix!
  6. Scoop batter into 12 paper lined muffin cups.
  7. Bake at 350º F for 25 minutes.
  8. Cool on baking rack.
3.3.3077

Filed Under: Bread Recipe, Breakfast Tagged With: Banana Peanut Butter Chocolate Chip Muffins, Muffin Recipe, Over-ripe banana recipe

Creamy Fresh Tomato Basil Soup

August 18, 2015 By Michelle Leave a Comment

Creamy Tomato Basil Soup
My mom came to visit recently and whenever she comes she always brings me bags of goodies from her garden. There is just nothing better than fresh cucumbers, okra, and eggplant. But my favorite thing is a red, juicy, ripe tomato!

Her garden was overflowing so she brought a ton of veggies. She brought so many tomatoes, there was no way that I’d be able to eat them all before they went bad. I knew I’d have to do something with them so I decided to make one of my other favorite things – Creamy Fresh Tomato Basil Soup.

I’ll go ahead and warn you that you might want to double the recipe if you plan on sharing this soup with anyone. It never fails that I tell myself that I am done and then I take another bite…and then another….and then another…and another. Until finally I just pull the bowl out of the fridge and finish it off!

This is the perfect tomato soup and beats any canned soup that you’ve ever had. The fresh tomatoes and basil just makes this soup incredible. If you find yourself with an abundance of fresh tomatoes this is a must-make recipe. If you don’t have an abundance of fresh tomatoes…go hunt some down! I promise this recipe is worth it!

Creamy Fresh Tomato Basil Soup
 
Print
Author: Michelle
Serves: 4
Ingredients
  • 3 tablespoons butter, divided
  • 1 medium Vidalia onion, chopped
  • 4 cloves garlic, chopped
  • 4 cups fresh tomatoes, chopped
  • 2 cups chicken stock or broth
  • 2 tablespoons fresh basil, chopped
  • 2 tablespoons flour
  • ½ teaspoon sugar
  • 1 teaspoon salt
  • ½ teaspoon black pepper
  • 1 tablespoon balsamic vinegar
  • 1 cup heavy cream
Instructions
  1. Add one tablespoon of butter into a large pot and saute the chopped onion and garlic for 2 -3 minutes until softened.
  2. Add the chopped tomatoes and bring to a boil.
  3. Pour in the chicken stock and simmer on medium-low heat for 20 minutes.
  4. Add the basil then use an immersion blender to puree the soup. (You can also use a blender or run through a food mill if desired.)
  5. In a small pot, melt 2 tablespoons of butter over medium-low heat and add the 2 tablespoons of flour. Mix to combine and cook the roux for about one minute.
  6. Add ½ cup of the pureed soup to the roux and whisk together to remove all lumps.
  7. Spoon/pour the roux into the hot soup and whisk to combine.
  8. Cook over medium for 2 minutes.
  9. Add the sugar, salt, pepper, balsamic vinegar and the cream and serve.
3.3.3070


Filed Under: Soups Tagged With: Creamy Fresh Tomato Basil Soup

Broccoli With Cheese Sauce

August 12, 2015 By Michelle Leave a Comment

Broccoli with Cheese Sauce

Broccoli is the number one veggie at my house. My boys love it no matter what I do to it. I can roast it, boil it, steam it stick it in a casserole or pour cheese sauce over it and they will gobble it up!

I promised the boys some Broccoli with Cheese Sauce only to find that I was out of milk. We had been out of town and I hadn’t had a chance to stop by the store yet. I happened to be Skyping with my buddy Mindy about our dinner plans and she let me know that her cheese sauce recipe didn’t require milk. I was intrigued and you know I had to try that recipe!

She said that this was the recipe that her mom had been making since she was a little girl. I figured there was plenty of milk in the cheese – right? Well, I am happy to report that my guys loved it. The recipe is super similar the one that I make and I love that it’s an option for those days when I might not have milk on hand. Of course you can always use milk in place of the water. If you are feeling naughty and want a super rich sauce, use half in half in place of the water.

Steam up some broccoli and then add the cheese sauce and you have a delicious side dish that your whole family will love. This recipe is super quick and you can have it done in no time flat!

Broccoli With Cheese Sauce
 
Print
Cook time
5 mins
Total time
5 mins
 
Author: Michelle
Serves: 6 - 8
Ingredients
  • 2 tablespoons butter
  • 2 tablespoons flour
  • 1 cup water
  • 8 oz sharp cheese, shredded from the block
  • salt & pepper
  • garlic powder
Instructions
  1. Melt butter in small pan over medium-high heat. Add flour and stir. Add water and continue to stir while heating. Sauce will thicken, after letting bubble for 1 min, remove from heat and stir in cheese. Add salt, pepper garlic powder to taste.
Notes
Milk can be used in place of the water. For a rich sauce, use half and half in place of the water.
Recipe from Darlene St. Pierre
3.3.3070

Filed Under: Side Dish, Vegetarian Recipe Tagged With: Broccoli with cheese sauce, Cheese sauce recipe, easy cheese sauce

Homemade Honey Graham Sticks

July 22, 2015 By Michelle 2 Comments

Honey Graham Sticks

I am doing a promotion over on one of my other sites (I Heart Publix) with some back to school recipes. I thought that I’d share one of my boys’ all time favorites over here too.

Why not try your hand at these Homemade Honey Graham Sticks? I could make these every single week and my boys would never get tired of them. Plus they are so versatile and the best little dipper…who doesn’t love them?

The first time I had a homemade graham cracker, I have to admit I was in awe. I was much younger and didn’t even know what ingredients were needed to make a graham cracker! Once I realized that it’s a simple dough and ultimately just a crispy cookie…it didn’t seem like such a mystery anymore!

Now when you look at the prep time you are going to think that this recipe is impossible. BUT…this is one of those recipes with a whole lot of inactive prep time. All that means is that you do a bunch of waiting around.

It will take you maybe 10 minutes to gather your ingredients and make your dough. I usually do that in the morning. Then I toss the dough in the fridge and forget about it for a while. There’s the inactive prep that I was talking about.

This dough needs time to harden so you can roll it out. It’s a sticky dough and can be tough to work with so you want it to be cold before you start messing with it.

After a few hours, you grab your dough and roll it out on a silpat or parchment. Then grab your pastry cutter or pizza wheel. A few zips around the dough followed by a a bunch of pokes with a wooden skewer and you have the start to your graham sticks. That step is probably the longest in the whole process. I would guess that you’d need about 10 -15 minutes. I can do it in my sleep and probably knock it out in under 10 at this point!

Once again, the dough has to go back in the fridge for a bit. Having just rolled and manipulated the dough, you’ve warmed it up and so there’s no way you can move those fragile little sticks at this point. Once the dough has had time to chill, you’ll be able to move them over to the pan, bake them and enjoy them with your favorite dip!

I think you’ll find that while you might have to do a few steps over a longer period, the effort is totally worth it. I actually like that the steps are broken up a bit…it doesn’t feel like it takes me very long to make these as I am not really spending much time in the kitchen at once.

I hope you’ll try these. Come back and let me know what you think!

Homemade Honey Graham Sticks
 
Print
Prep time
3 hours
Cook time
15 mins
Total time
3 hours 15 mins
 
Author: Michelle
Serves: 4 dozen
Ingredients
  • 2½ cups all purpose flour
  • 1 teaspoon baking soda
  • ½ teaspoon salt
  • 1¼ teaspoon cinnamon (divided)
  • ¾ cup packed brown sugar
  • ½ cup cold butter, cubed
  • ¼ cup whole milk
  • 2 teaspoons vanilla
  • ⅓ cup honey
  • 2 tablespoons sugar
Instructions
  1. Add the flour, baking soda, salt and ¼ teaspoon of cinnamon to the bowl of your stand mixer. Use the paddle attachment and mix on low until combined.
  2. Add the cubed butter to the dry ingredients and mix on low for about 3 minutes until the mixture is crumbly like oatmeal.
  3. In a separate bowl, mix the milk, vanilla and honey until combined.
  4. Pour into the dry ingredients and mix on low for about 1 -2 minutes until the dough forms. Be aware that the dough is a soft, sticky dough.
  5. Divide the dough and shape into two discs and wrap in plastic wrap.
  6. Refrigerate for about 2 hours or until firm.
  7. As this is a very soft, sticky dough, I find that it's easiest to roll this out on a floured silpat (or parchment) this will make moving the sticks easier when needed!
  8. Once the dough is about ⅛" inch thick, I use a pastry wheel to cut the dough into strips about ¾" wide by 2½" long. You can also use a pizza wheel or knife.
  9. Use a wooden skewer to poke holes down the length of each graham stick.
  10. Mix the remaining cinnamon with the sugar and sprinkle over the cut dough (reserve half of the mixture for the other dough ball.)
  11. Place the entire silpat of cut dough (or parchment) on a cookie sheet and refrigerate for 30 - 45 minutes until the dough is firm.
  12. Preheat the oven to 350º F.
  13. Now it will be easier to remove the sticks without warping or tearing them. Gently peel each graham stick from the silpat and place on a parchment lined pan, spacing at least ½ inch apart.
  14. Bake in a 350º oven for 10 - 15 minutes or until golden brown.
  15. Allow to cool and serve with your favorite dip!
  16. Repeat with the second ball of dough.
3.3.3070

Adapted from Good Housekeeping

Filed Under: Uncategorized Tagged With: Graham Cracker Sticks, Homemade Honey Graham Sticks

Chocolate Covered Cherry Dream Pie – No Bake Dessert!

July 8, 2015 By Michelle 1 Comment

Chocolate Covered Cherry Dream Pie

Cherries are in season right now and whenever I walk through the store I have visions of chocolate covered cherries dancing in my head. I also think about one of my all time favorite pies – my Chocolate Covered Cherry Dream Pie.

This one is great because you don’t even have to turn on the oven. In fact it really requires very little effort. It’s a three stage dessert but honestly it doesn’t take very much time to put together. I’d give this one an easy rating – so it’s a perfect recipe even for beginners!

If you are craving chocolate covered cherries but don’t feel like pulling out your cherry pitter, this is the recipe for you!

Start with an Oreo crust. It’s a very simple whirl around the food processor with a little butter and then pressed into a pan.

oreo crustNext your whip up your filling. A little cream cheese, powdered sugar, cherry pie filling, and whipped cream is all your need!

fillingFinally the ganache is the finishing touch! Just heat whipping cream to boiling then take it off the heat. Add your milk chocolate morsels and let it sit for five minutes. Stir it up and that’s it!

ganacheThe hard part is waiting for it to chill!

5.0 from 1 reviews
Chocolate Covered Cherry Dream Pie - No Bake Dessert!
 
Print
Prep time
2 hours
Cook time
5 mins
Total time
2 hours 5 mins
 
Author: Michelle
Serves: 12
Ingredients
  • 24 Oreo Cookies
  • ¼ cup butter, melted
  • 8 oz cream cheese, softened
  • 1 cup powdered sugar
  • 1 can cherry pie filling (21 oz)
  • 1 cup Cool Whip, thawed
  • ½ cup whipping cream
  • 11½ oz milk chocolate morsels
Instructions
Crust
  1. Place Oreo cookies into a food processor and pulse until broken into small crumbs.
  2. Add the butter and pulse to combine.
  3. Pour into a deep dish pie pan and push to bottom and sides.
  4. Refrigerate for 30 minutes or until set.
Filling
  1. Combine the cream cheese and powdered sugar and mix until creamed together.
  2. Fold in the cherry pie filling and then the Cool Whip.
  3. Pour into the Oreo pie crust then place back into the refrigerator while you prepare the ganache.
Ganache
  1. In a small saucepan, bring the whipping cream just to boiling over medium-high heat.
  2. Remove from heat and add chocolate morsels, but do not stir.
  3. Let stand for 5 minutes then stir until smooth.
  4. Pour over pie and refrigerate at least 2 hours until set.
3.3.3070


Filed Under: Desserts Tagged With: Cherry Pie, Chocolate Cherry Pie, Chocolate Covered Cherry Dream Pie

  • « Previous Page
  • 1
  • 2
  • 3
  • 4
  • 5
  • …
  • 24
  • Next Page »
Visit Michelle @ iHeartKitchen.com's profile on Pinterest.

Recent Posts

  • Gelatin Shots Recipe
  • Berry Pecan Salad – Easy & Delicious Salad For Anytime!
  • Green Fizz Party Punch
  • Caribbean Rush Cocktail
  • Cherry Vanilla Whoopie Pies

Categories

Archives

Copyright © 2019 I Heart Kitchen - All Rights Reserved. | Technical support by Coupon Dad over at Lucky Dad Media, LLC

Copyright © 2014 I Heart Kitchen - All Rights Reserved    |   Privacy Policy | Terms of Use